| Summary | An example UI plugin based in JS that can generate code snippets for hobbyists and devs alike to expand upon. | |
| Repository | Stash UI Plugin Example | |
| Source URL | https://serechops.github.io/Serechops-Stash/index.yml | |
| Install | How to install a plugin? |
Overview
1. Purpose
- Integrate custom UI elements into Stash: Adds buttons and modals in the Stash interface for advanced interactions.
- GraphQL API Integration: Runs sample queries (
performerCountandsceneCount) to demonstrate how to retrieve data from Stash. - Generate Reusable Code: Creates downloadable JavaScript snippets for further customization.
2. Key Features
- Buttons in Navbar:
- Adds “Open Actions” and “Help” buttons to the Stash navbar using the
parentSelector.
- Adds “Open Actions” and “Help” buttons to the Stash navbar using the
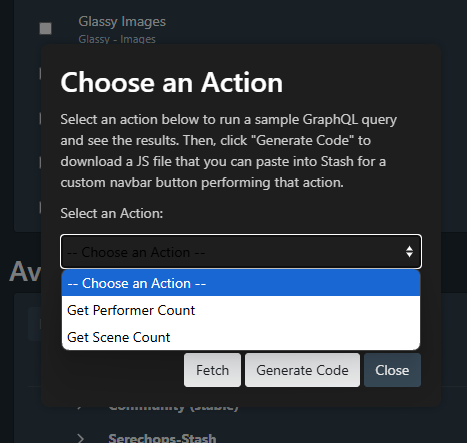
- Dynamic Modals:
- Displays modals (pop-up dialogs) for actions and help instructions.
- GraphQL Queries:
- Queries the Stash GraphQL API to fetch performer and scene counts.
- Code Generation:
- Generates standalone JS snippets for custom actions.
- Inline Help:
- Provides guidance for new developers on how to customize and extend the script.
3. Main Components
-
Configuration (
config):- Stores:
- API endpoint and authentication settings.
- UI settings (modal IDs, styles, text for buttons).
- Predefined GraphQL queries (
performerCountandsceneCount).
- Stores:
-
Button Creation (
createButton):- Dynamically creates buttons with specific IDs, styles, and event handlers.
-
Modal Creation (
createDarkModal):- Builds dark-themed modals using custom styles.
- Allows
showandhidefunctionality.
-
GraphQL API Integration:
- Headers (
gqlHeaders): Adds anAuthorizationheader if an API key is available. - Query Execution (
performGraphQLQuery): Executes queries with optional variables usingfetch.
- Headers (
-
Event Handlers:
- “Fetch” Button: Runs the selected query and displays results.
- “Generate Code” Button: Creates a downloadable JS file based on the selected action.
-
Dynamic UI Injection:
- Uses
MutationObserverto wait for the.navbar-buttonselement to load before injecting buttons and modals.
- Uses
How a Developer Can Expand This Plugin
-
Add New Actions:
- Extend the
queriesobject with more GraphQL queries (e.g., studio counts, tags, or other filters). - Update the
<select>dropdown with new options for these queries.
Example:
- Extend the
   studioCount: `
     query FindStudios {
         findStudios(filter: { per_page: -1 }) {
             count
             studios {
                 name
             }
         }
     }
 `
-
Add Input Fields for Dynamic Queries:
- Let users specify variables (e.g., performer name or date range) by adding input fields to the modal.
Example:
 <label for="performer-name">Performer Name:</label>
 <input id="performer-name" type="text" style="width:100%;padding:5px;" />
Modify the query with variables:
const variables = { name: document.getElementById('performer-name').value };
-
Build Advanced UI Components:
- Use grids or tables to display query results in a more structured format (e.g., performers with scene counts).
- Add image previews, clickable links, or buttons for further actions.
-
Integrate with Existing Plugins:
- Combine this plugin with others to share data or trigger workflows (e.g., updating metadata, organizing content).
-
Add Real-Time Updates:
- Periodically refresh data or listen for changes using Stash WebSocket API (if supported).
-
Explore New GraphQL Schema:
- Investigate the full capabilities of the Stash API and experiment with queries like:
- Performer-specific stats
- Scene tag distribution
- Scene duration averages
- Investigate the full capabilities of the Stash API and experiment with queries like:
-
Use Stash API Events:
- Trigger specific actions (e.g., adding scenes to playlists or tagging performers) by leveraging mutation queries.
Technical Details
1. Storing Server Connection Details
The script retrieves the necessary server details from the user’s browser localStorage:
const config = {
    gqlEndpoint: localStorage.getItem('apiEndpoint') || '/graphql',
    apiKey: localStorage.getItem('apiKey') || null,
};
-
gqlEndpoint: The URL of the GraphQL server.
- Default:
/graphql(assumes the Stash server is hosted locally or on the same origin as the frontend). - Overrides: Users can specify a custom endpoint in their browser’s
localStorage.
- Default:
-
apiKey: Optional authentication token.- If the Stash instance requires authentication, the API key is stored in
localStorageand included in the request headers.
- If the Stash instance requires authentication, the API key is stored in
This design allows flexibility and avoids hardcoding server connection details directly into the script.
2. Constructing Request Headers
The gqlHeaders function dynamically creates the necessary HTTP headers for a GraphQL request:
const gqlHeaders = () => {
    const headers = { 'Content-Type': 'application/json' };
    if (config.apiKey) {
        headers['Authorization'] = `Bearer ${config.apiKey}`;
    }
    return headers;
};
Content-Type: Specifies that the request body contains JSON.Authorization: If an API key is provided, it’s added as aBearertoken to theAuthorizationheader.
3. Performing a GraphQL Query
The script sends GraphQL queries to the server using fetch:
const performGraphQLQuery = async (query, variables = {}) => {
    try {
        const response = await fetch(config.gqlEndpoint, {
            method: 'POST',
            headers: gqlHeaders(),
            body: JSON.stringify({ query, variables }),
        });
        const data = await response.json();
        return data?.data || null;
    } catch (error) {
        console.error('Error performing GraphQL query:', error);
        return null;
    }
};
- Input:
query: The GraphQL query string.variables: Optional variables for parameterized queries.
- Process:
- Uses the
fetchAPI to send an HTTPPOSTrequest to the GraphQL endpoint. - Attaches the headers and query payload.
- Uses the
- Output:
- Returns the
dataobject from the server’s JSON response ornullif there’s an error.
- Returns the
4. Connecting the UI to the Server
The server logic is tied to the UI via event listeners:
- When users interact with the modal (e.g., selecting an action), the script calls
performGraphQLQuerywith the appropriate query. - Results are dynamically displayed in the modal’s results container.
Example:
fetchBtn.addEventListener('click', async () => {
    const selectedValue = actionSelect.value;
    if (!selectedValue) {
        resultsContainer.textContent = 'Please select an action first.';
        return;
    }
    const query = config.queries[selectedValue];
    const result = await performGraphQLQuery(query);
    resultsContainer.textContent = result ? JSON.stringify(result, null, 2) : 'Error fetching data.';
});
5. Extending the Server Connection Logic
If you want to expand upon this, here are a few ideas:
a. Adding Support for Multiple Servers
- Allow users to switch between different Stash instances by storing and retrieving multiple
gqlEndpointvalues.
Example:
const stashInstances = JSON.parse(localStorage.getItem('stashInstances') || '[]');
// Users can select from a dropdown of endpoints
b. Dynamically Setting the API Key
- Prompt the user for the API key when it’s missing:
if (!config.apiKey) {
    config.apiKey = prompt('Enter your Stash API key:');
    if (config.apiKey) localStorage.setItem('apiKey', config.apiKey);
}
c. Advanced Query Features
- Add support for:
- Pagination
- Query variables
- Filtering
- Sorting
Example of a variable-based query:
const performerByNameQuery = `
    query FindPerformer($name: String!) {
        findPerformers(filter: { name: { value: $name } }) {
            performers {
                id
                name
            }
        }
    }
`;
await performGraphQLQuery(performerByNameQuery, { name: 'Jane Doe' });
Further Thoughts for UI Plugin Development
- Explore Stash’s GraphQL Schema:
- Use tools like GraphiQL to find additional queries or mutations.
- Test Queries:
- Try new filters, pagination, or aggregations to refine the data displayed in the UI.
- Optimize UI:
- Use animations, CSS styling, and intuitive layouts to enhance the user experience.
By expanding upon this base, developers can create robust, and interactive plugins that integrate seamlessly with Stash.