| Summary | Companion app for Stashapp and makes working with markers and tags much easier. | |
| Repository | https://github.com/MinasukiHikimuna/stash-marker-studio |
Stash Marker Studio

Stash Marker Studio is a companion app for Stashapp and makes working with markers and tags much easier. It was mainly designed to support using Skier’s NSFW AI model but it works with any markers.
To reliably use tools like Skier’s NSFW AI model or marker sources such as TPDB or timestamp.trade, there needs to be some kind of review. The opinionated approach of Stash Marker Studio is as follows:
- Markers always have a single, actual tag stored as primary tag.
- Additional tags of markers are used only for metadata such as is the marker confirmed or rejected or what is the source for that marker.
- When a scene is reviewed, user will confirm or reject the markers on the scene. Rejected markers can be easily deleted.
- After review is completed, all tags with corresponding tag metadata from a scene and its markers will be removed and only the tags from the confirmed markers will be saved. Tags which were previously present on a scene and did not originate from any of the markers will not be touched.
Stash Marker Studio also optionally supports PySceneDetect which will analyze the video stream, detect shot boundaries and use those for easier navigating when reviewing and finetuning the markers.
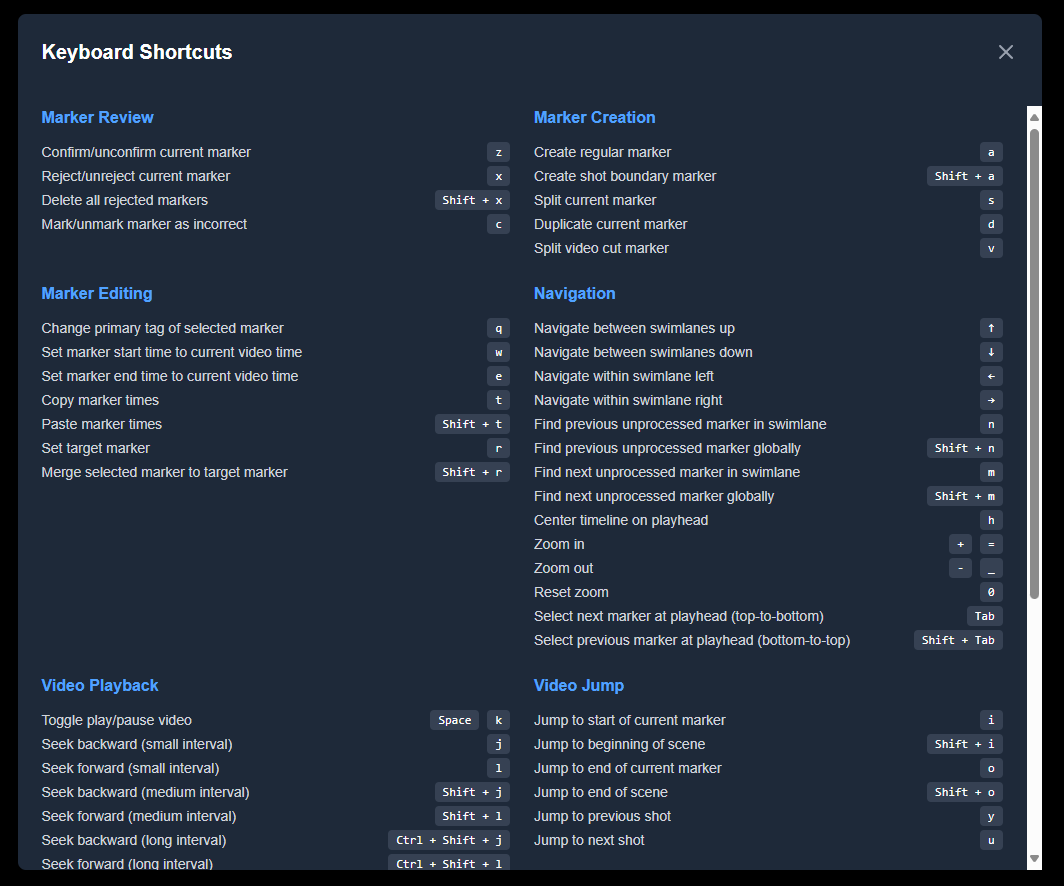
Stash Marker Studio is heavily centered around keyboard use and many functionalities are only available using those. You can click on i icon to see the full list. The guiding principle is that left hand is used for modifying actions and right hand is used for navigating within the scene.
Navigation and Workflow
Timeline Navigation
The application provides comprehensive keyboard-driven navigation through the timeline:
Swimlane Navigation: Move between different marker categories using arrow keys. Navigation follows the visual swimlane order from top to bottom, and stops at boundaries without wrapping around.
Timeline Zoom: Adjust the temporal resolution for detailed work or broader context. Zoom operations maintain the playhead position as the focal point, with minimum and maximum limits to prevent excessive scaling.
Playhead-Based Selection: Automatically select markers based on the current video position. The system searches forward and backward in time from the playhead position and updates automatically as the video plays.
Timeline Centering: Keep important content visible during navigation by centering the timeline view on the current playhead position while maintaining the current zoom level.
Marker Review Workflow
Unprocessed Marker Navigation: Efficiently navigate between markers that need review. The system provides both swimlane-scoped navigation (within the current category) and global navigation (across all categories). Navigation is predictable and never wraps around unexpectedly.
Video Playback Control: Comprehensive video navigation including play/pause, seeking operations, and frame-precise stepping for detailed work. All frame operations account for video-specific frame rates with automatic detection and appropriate fallbacks.
Marker State Management: Toggle markers between confirmed, rejected, and unprocessed states using dedicated keys. The system uses toggle behavior where repeated presses cycle between the action state and unprocessed, making it easy to correct mistakes.
Marker Creation and Editing
Multiple Creation Methods: Create regular markers, shot boundary markers for scene transitions, duplicate existing markers, and split markers into multiple segments. All creation operations provide immediate visual feedback and support rapid marker creation without interrupting video flow.
Advanced Editing Operations: Modify marker properties including tag assignment, precise timing adjustments, and advanced operations like copying timing data between markers and merging marker properties. All timing operations use frame-accurate precision with validation to prevent invalid configurations.
Shot Boundary Integration: Navigate between detected shot boundaries using PySceneDetect integration when available, with fallback to manual shot boundary markers for consistent navigation experience.
AI Feedback Collection
For users working with AI-generated markers, Stash Marker Studio includes a specialized feedback collection system to help improve AI model training:
Independent Feedback System: The AI feedback collection operates separately from the normal marker workflow. When you flag a marker for AI feedback, it automatically gets rejected but the feedback data persists independently of the marker’s lifecycle.
Screengrab Generation: When exporting feedback data, the system captures video frames for each collected marker to provide visual context for the AI training data.
Export Capabilities: Collected feedback can be exported as organized zip files containing marker metadata and associated screengrabs, suitable for AI model improvement workflows.
Local Storage: All feedback data is stored locally in your browser and survives across sessions. Data remains local until you explicitly export it - there’s no automatic synchronization with the server.
Note: This feature is distinct from the “Corresponding Tags” system, which is used for general tag organization and conversion workflows regardless of marker source.
Workflows
General Marker Review Workflow
Stash Marker Studio supports both AI-generated marker review and general marker creation/editing workflows:
For AI-Generated Markers:
- Load scene with existing AI-generated markers
- Navigate through unprocessed markers using keyboard shortcuts
- Confirm or reject markers based on accuracy
- Use corresponding tag conversion to map AI tags to final tags
- Optionally collect feedback on problematic AI predictions
- Complete review and apply final tag conversions
For Manual Marker Creation:
- Create new markers at current video position during playback
- Set precise start/end times using frame-accurate controls
- Apply appropriate tags and organize using marker groups
- Duplicate and modify existing markers for efficiency
- Use shot boundary detection for scene transition markers
Example AI Review Workflow
- New scene is added to Stashapp
- Scene is matched with Tagger feature in Stashapp
- AI_TagMe tag is set to scene and Skier’s AI model is applied to it
- PySceneDetect script is run to analyze scene to get shot boundaries
- Manual marker review begins: confirm or reject the markers using keyboard shortcuts
- Use corresponding tag conversion to change AI tags to their target real tags
- Mark scene as reviewed and move to next scene
The corresponding tag system works by setting tag descriptions in Stashapp. For example, setting “Kissing_AI” tag’s Description to “Corresponding Tag: Kissing” creates the relationship. Stash Marker Studio’s “Convert Corresponding Tags” functionality shows these conversions for user confirmation before applying them.
Interface Overview
Timeline Organization
Stash Marker Studio organizes markers using a two-level system for maximum flexibility:
Swimlanes: Each unique tag gets its own horizontal track (swimlane) in the timeline. When multiple markers overlap in time within the same swimlane, they automatically use separate tracks to prevent visual conflicts. This ensures all markers remain visible and clickable.
Marker Groups: Multiple related swimlanes can be organized into visual groups with custom names and ordering. This is configured through the marker group parent tag system, allowing you to group related content (e.g., “1. Positions”, “2. Actions”, etc.) for better organization.
Corresponding Tag Management
Tags can be linked together using the “Corresponding Tag” system. When you set a tag’s description to “Corresponding Tag: TagName” in Stashapp, those tags will be grouped together on the same swimlane. This is useful for organizing related tags like “Kissing” and “Kissing_AI” together.
Each swimlane displays a gear icon on hover that provides different interfaces based on the current state:
- No relationships: Shows a tag autocomplete to set up corresponding tag relationships
- Existing relationships: Shows a list of connected tags with individual remove buttons for each relationship
Marker States
Markers can be in one of three states, each with distinct visual styling:
- Unprocessed: New markers awaiting review (default state)
- Confirmed: Approved markers tagged for retention
- Rejected: Rejected markers tagged for potential deletion
The interface provides visual feedback for each state, with rejected markers using red styling and confirmed markers using distinct highlighting.
Getting Started
Stash Marker Studio requires Stash version 0.28 or later. 0.28 introduced support for start and end times for markers which is crucial for the tool.
Quick Start with Docker (Recommended)
The easiest way to get started is using the pre-built Docker image from GitHub Container Registry:
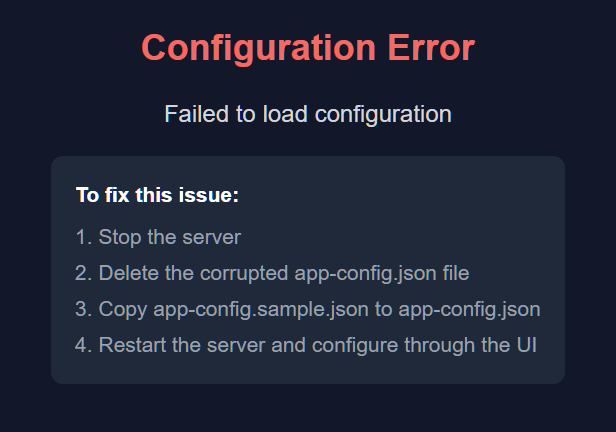
Create configuration file cp app-config.sample.json app-config.json # Run the latest image docker run -p 3000:3000 -v ./app-config.json:/app/app-config.json Package stash-marker-studio · GitHub
Open http://localhost:3000 and use the configuration UI to set up your Stashapp connection and tag IDs.
Alternative: Build from Source
If you prefer to build the image yourself:
- Clone the repository
- Copy the sample configuration file:
cp app-config.sample.json app-config.json
- Build and run the Docker image:
docker build -t stash-marker-studio . docker run -p 3000:3000 -v ./app-config.json:/app/app-config.json stash-marker-studio
- Open http://localhost:3000
- Use the configuration UI to set up your Stashapp connection and tag IDs
- Start using Stash Marker Studio!
Running for Development
Install dependencies npm install # Start development server npm run dev
Shot boundary analysis with PySceneDetect
For pyscenedetect-process.js, you need to install PySceneDetect and ffmpeg, then run the custom script which will run shot boundary analysis on your scenes which have already been AI analyzed.
Requirements:
- PySceneDetect: Version 0.5.6 or higher recommended
- ffmpeg: Version 7.1 or higher recommended
You can check your installed versions:
scenedetect version ffmpeg -version
Run the script:
npm install node src/scripts/pyscenedetect-process.js
The script will automatically check for these dependencies and display warnings if older versions are detected.
Configuration
Configuration is managed through the application’s internal configuration interface accessible at http://localhost:3000. The configuration system requires specific tag IDs to be created in your Stashapp database to manage marker states and organization.
Required Tags
You’ll need to create the following tags in Stashapp. Tag names are customizable, but the example names shown follow common conventions:
Marker Status Tags:
- Status Confirmed: Assigned to approved markers permanently (example: “Marker Status: Confirmed”)
- Status Rejected: Assigned to rejected markers until deletion (example: “Marker Status: Rejected”)
- Source Manual: Assigned to markers created manually in the application (example: “Marker Source: Manual”)
- AI Reviewed: Assigned to scenes after marker review completion (example: “AI_Reviewed”)
Marker Grouping Tags (Optional):
- Marker Group Parent: Parent tag for organizing marker groups (example: “Marker Group”)
- Create child tags with pattern “Marker Group: N. DisplayName” for organization
- Enables visual grouping of related marker types in the timeline
PySceneDetect Integration Tags (Optional):
- Shot Boundary: Primary tag for shot boundary markers (example: “Video Cut”)
- Source Shot Boundary: Source tag for PySceneDetect-created markers (example: “Marker Source: PySceneDetect”)
- AI Tagged: Tag for scenes ready for PySceneDetect processing (example: “AI_Tagged”)
- Shot Boundary Processed: Tag for scenes processed by PySceneDetect (example: “Scenes: PySceneDetect: Processed”)
Server Configuration
Configure your Stashapp connection through the configuration interface:
- Stashapp URL: Your Stash GraphQL endpoint (typically http://localhost:9999/graphql)
- API Key: Authentication key from Stashapp Settings → Security (leave empty if no auth required)
Development
This project uses:
- Next.js 15 with App Router
- TypeScript for type safety
- Tailwind CSS for styling
- GraphQL for API communication